Using Github Action to Automate Deployment

بمس الله الرحمن الرحيم
Hello,
Previously i was talking about how i decided to use Github Action.
I mentioned the most common way to utilise Github Action is to do Continuous Integration & Continuous Deployment.
Continuous Integration
Continuous Integration is a practice in software development that involves automating the integration of code changes from multiple contributors into a single software project.
To understand that definition easily, imagine an automated way to prevent bad code/buggy code from being merged to the main branch.
Yes, CI is an automated process that usually runs on pull requests to do a certain action. Usually, it will do an automated test on the PR's branch.
If the tests are failing, then we can't merge it, if the tests are successful, then we can merge.
Continuous Deployment
Continuous deployment is a strategy in software development where code changes to an application are released automatically into the production environment.
I think the definition is straightforward. It's a way to automate the deployment without doing much hassle to build it manually, then upload it to the cloud service/VPS, and then deploy.
Usually, CD uses the same automation script as CI, with an additional job to actually deploy the application.
Now, back to Github Action
This is the script that i use in my Blog’s CMS repo
name: build-deploy
on:
  push:
    branches:
      - "main"
jobs:
  build-push:
    runs-on: ubuntu-latest
    steps:
      - name: Checkout
        uses: actions/checkout@v4
      - # Add support for more platforms with QEMU (optional)
        # https://github.com/docker/setup-qemu-action
        name: Set up QEMU
        uses: docker/setup-qemu-action@v3
      - name: Set up Docker Buildx
        uses: docker/setup-buildx-action@v3
        with:
          driver-opts: network=host
      - name: Login to Docker Hub
        uses: docker/login-action@v3
        with:
          username: ${{ secrets.DOCKERHUB_USERNAME }}
          password: ${{ secrets.DOCKERHUB_TOKEN }}
      - name: Build and push
        uses: docker/build-push-action@v5
        with:
          push: true
          tags: ranggarifqi/rangga-rifqi-com-api:latest
  deploy:
    needs: build-push
    runs-on: ubuntu-latest
    steps:
      - name: Pull & Deploy
        uses: appleboy/[email protected]
        with:
          host: ${{ secrets.SSH_HOST }}
          username: ${{ secrets.SSH_USERNAME }}
          password: ${{ secrets.SSH_PASSWORD }}
          key: ${{ secrets.SSH_PRIVATE_KEY }}
          script: |
            cd ~/ranggarifqicom
            ./deploy.sh
This script only handles continuous deployment, why you ask?
It’s because I’m using Strapi CMS for my blog, so I don’t think I need to test it unless I create a custom plugin for it or something.
Also, I’m using docker to simplify the deployment without facing some installation issue.
Let’s talk about the script
The trigger
on:
  push:
    branches:
      - "main"
This will make that script triggers when there’s any push to the main branch.
1st job, build-push
runs-on: ubuntu-latest will make this job runs on ubuntu machine. I think there are other several machines available for github action other than ubuntu.
So, to make it simple, this is what it does:
- Checkout to the repo
- Setup QEMU static binaries. This is used to run builders for architectures other than the host. I do this because i’m using docker.
- Setup Docker builders. I set up the driver’s option to be network=host just for some precaution. Later i’m planning to make the image’s docker container able to connect to the host’s postgreSQL. I haven’t done much research on this actually, cos this is just to setup the builder, not to run the docker image. So i can’t say whether it’s fine to remove the driver option or not.
- Login to the docker hub. Yes, in order to deploy, we need to push the built docker image to the hub, so that later we can pull it in our VPS.
-
- Please note that, never put any sensitive information inside the yaml file. Use secrets instead. I will explain about that in a bit.
- Then i use docker/build-push-action@v5 to do the build, and the push. For the tags property, you can set it anything as you want. latest is optional, if you don’t set it, it will always be default to latest.
2nd job, deploy
If you see the job’s script, you will find this
needs: build-push
So, i set it up so that it runs after the build-push job has run successfully.
This job only has 1 action
- name: Pull & Deploy
        uses: appleboy/[email protected]
        with:
          host: ${{ secrets.SSH_HOST }}
          username: ${{ secrets.SSH_USERNAME }}
          password: ${{ secrets.SSH_PASSWORD }}
          key: ${{ secrets.SSH_PRIVATE_KEY }}
          script: |
            cd ~/ranggarifqicom
            ./deploy.sh
So, i uses appleboy/[email protected] to login to my VPS and do some command. It accepts some authentication information, and then execute ./deploy.sh.
What is deploy.sh you may ask ?
It’s a simple shell script that i created & saved in the VPS to do the actual deploy.
This is the logic
#!/bin/bash

# pull docker image
docker pull ranggarifqi/rangga-rifqi-com-api:latest

docker stop rangga_rifqi_com_api
docker rm rangga_rifqi_com_api

# run the docker image with env variables setup on a certain port
docker run -d -p 1337:1337 --env-file ./.env --name rangga_rifqi_com_api ranggarifqi/rangga-rifqi-com-api:latest
So, basically, it pulls the docker image we just pushed previously
Then stopping the current docker container & remove it.
Then run it again.
Voila, now it’s deployed & accessible in port 1337
If you ask, how to set it to port 80 ?, well that’s out of the current topic. But the short answer is… NGINX.
What is Secrets & How to set it up ?
As i said previously, never ever put any sensitive information on the .yml file.
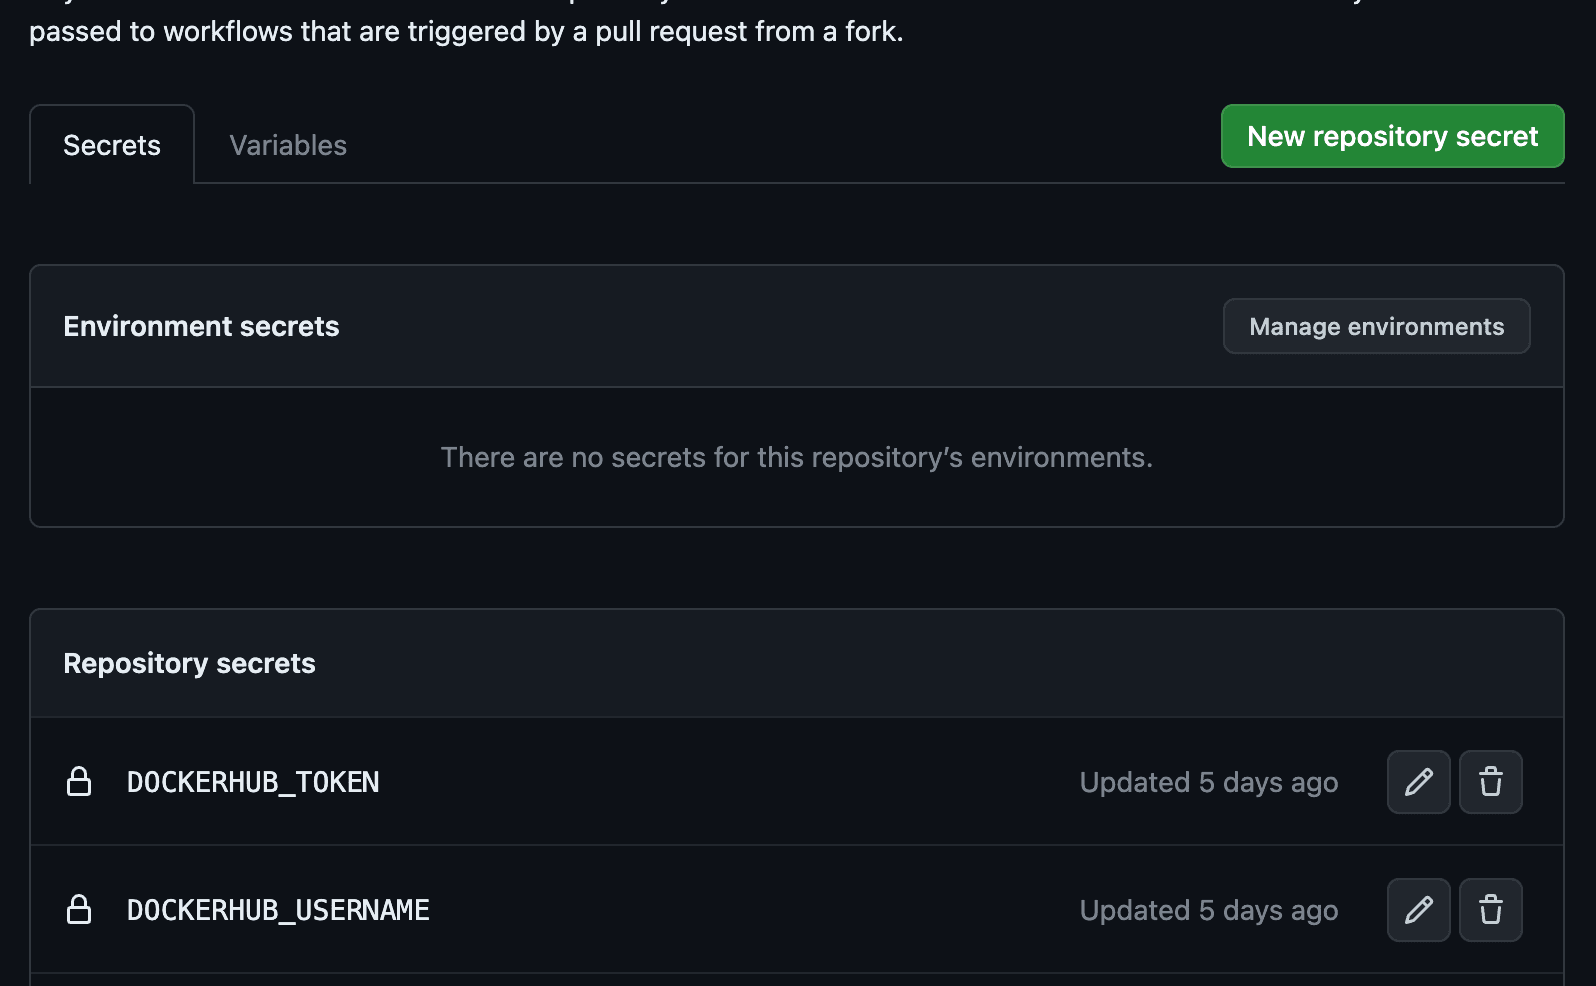
Github actions has a way to do this, and it’s called secrets. It’s pretty straightforward to use it. In the .yml file, you just specify ${{ secrets.SECRET_NAME }}.
Then, you go to your repo’s settings

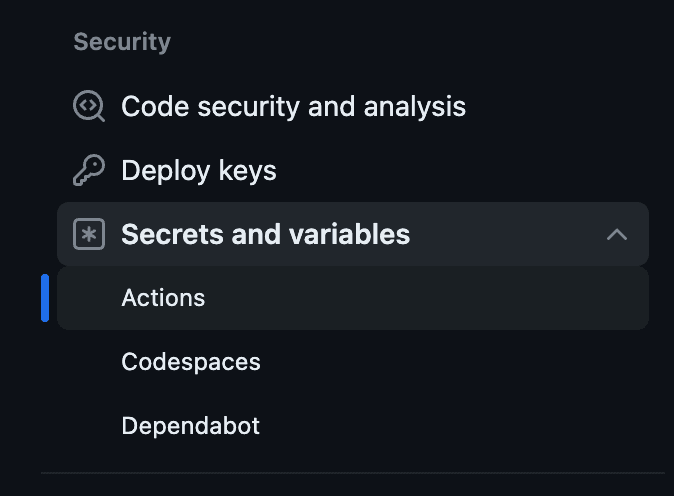
Then look at Secrets & Variables → Actions

Then you can click that big green button.

What you need to do is to set the name the same as the one you set in the .yml file.
And it’s done!
Conclusion
So, using GitHub action, we can do CI/CD to your projects without spending a dime.
Hope this article helps you
See you next time!
الى اللقاء
References:
- Cover Photo Image by pikisuperstar on Freepik
- What is continuous integration?